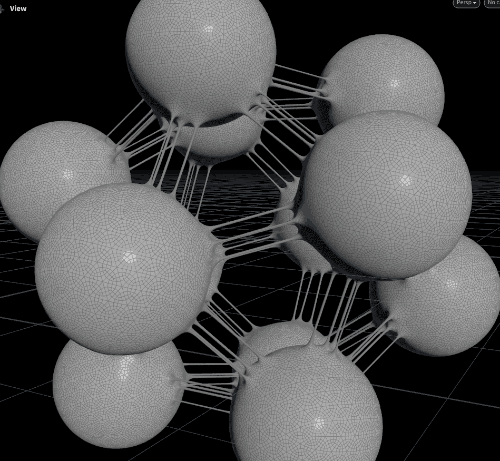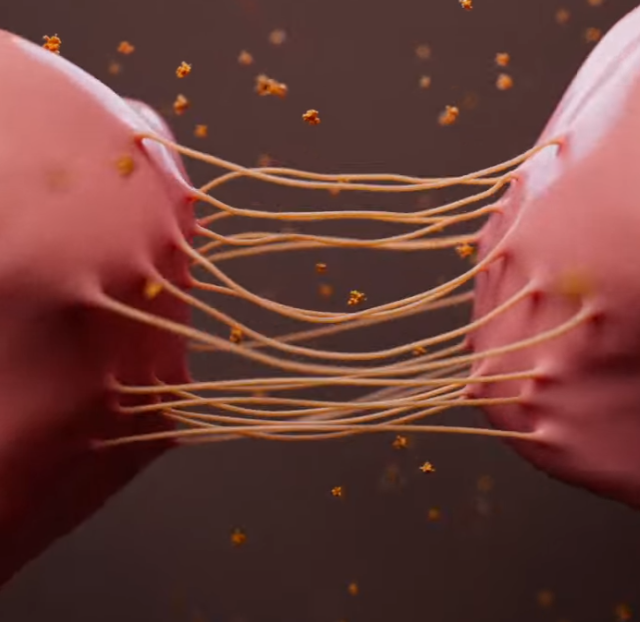
Here's the end result:
The Problem:
The Setup:
Here I will give a quick summary of the setup and challenge at hand:

Summary of each flow’s main parts as follows:
Vellum src geo setup-
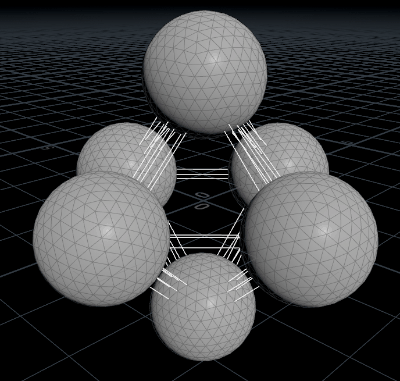
- Place some spheres on the points of a platonic input (tetrahedron in this case)
- Setup some groups and attributes, notably grouping for ‘not ball X’ for each ball, so it can know what geo is not itself
- calculate and store near points on neighbour balls
- Use collected data to create lines between the near points, and remove duplicates (for speed it just connects both ways then we get rid of extra lines)
- End result is some spheres which have polylines connecting certain points, like filaments between cells.
- Why so fiddly, why not just set it up? Well this way means I can get any arrangement of spheres as a setup very easily – the power of proceduralism! e.g. icosahedral input –

Vellum sim:
- This is a pretty straightforward setup for generic vellum wobbliness.
- Bring in the balls and lines as 2 streams – balls get strut setup, lines get vellum hair constraint
- The lines and balls are vellum welded after merging the streams
- The strut constraints group gets a attribute noise ‘timeoffset’ on the prims which we use to animate in solver
- Inside vellum solver (it’s a SOP type) there is a little trick: A geometry wrangle, set to operate on ‘ConstraintGeometry’ and the strut group, uses that timeoffset and some math to change the rest length of those constraints.
- There is a light POP force pulling the balls to their rest position so as they wobble they don’t drift off to oblivion.
- If there is interest in the animation part I can do a separate writeup of how that works in more detail.
Creating the Geometry:
Sounds conceptually simple – just figure out where those lines touch the balls, and somehow connect the geometry. Can’t be impossible. As usual the dev is in the details and I had to take a little time experimenting to find a way which worked reasonably well.
I will outline how I solved it, and I am sure there are possibly other ways and better approaches, so I would love to hear if anyone has done similar things also, and how. There’s always more to learn with Houdini!
I’ll summarise the steps and snags with them as follows:
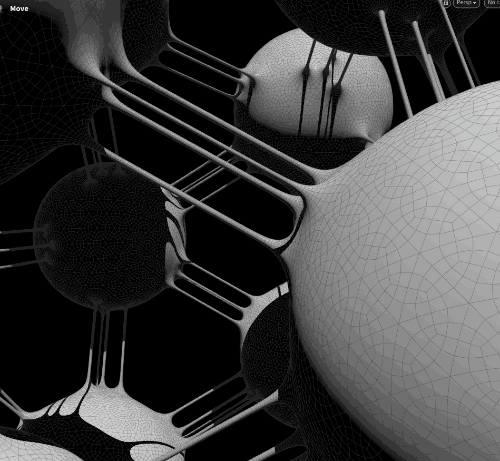
- We bring in the balls and lines, group the lines as ‘connectors’ and merge
- A prim wrangle iterates over connectors –
- “nearpt” for point 1 and 0 from the line tells us the point they should attach to
- We store some other data like the direction for that point’s geo (roughly the normal) and target pt/other end’s pt
- That data is stored on the points on the spheres where the lines touch
- Polybevel for those connecting points found in the wrangle – this is to prepare the shape of the geo to bridge – for this we keep the new geo in a group.

- Split the new hexagons – do some promoting and deleting of attributes, then remerge. This is so that we get clean values on prims like this:

- We then group these and iterate in a foreach. The group is for the source polygon, and it’s a little messy in that between 2 balls, there can be inconsistent direction. It is not problematic in my case but it’s something I might clean up at some point. You can see in this example one of the connectors source is on the left and all the rest are on the right:

- Inside the foreach, which runs over the source-ids of those hexagons, we do a polybridge. This was the fiddliest part and there was lots of testing and r&d as this node has so many options and controls. Before I settled on this plan, I was almost going to do it brute force using vex or somehow, but I was determined to use the nodes for this.
- Because of the approach with foreach loop, we don’t need to know which precise source or target we are dealing with, just which of the 2 prims is a source or a target, as there is only a minimal set available. This simplifies things a lot! My earlier tries got overcomplicated because of having too much geometry to reason about.

- This gets a nice hexagonal prism tube of geo between those hexagons, just as we want it.

- Then we just fuse, subdivide and blur the shape a little – and we have lovely continuous geo for skinning to the vellum sim!


Skinning etc:
With that being the hard part done and dusted, the rest is straightforward.

My attempt to be smart here was that I use point deform on the balls, and wire deform on the lines/tubes. point deform alone had too ugly looking shearing artifacts.

With this, and a blend attribute on the tube geo, the 2 deformed streams are blended and we throw in a subtle delta mush and another subdivide for good measure.

And that’s all there is – it was a nice result, and the eventual solution was pretty simple, but the learning curve was not insignificant, so my takeaway is that in Houdini there is always a way, and it pays off to push through the sticking point because the knowledge is transferable and ultimately adds to your toolbox of problem solving approaches.